Kenwood TM-D710 and GPS Install - APRS Mobile

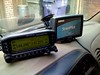
Continuing my project to have at lease least a dual-band 2m/70cm radio in the vehicles we use to travel to remote places, I got around to installing the Kenwood TM-D710 into the Dodge Ram. A few weeks ago, I read a review of the Green Light Labs GPS-710, a compact GPS that can attach to the rear of the D710s control panel. I installed that, too.

Kenwood TM-D710 control unit

The Kenwood TM-D710 is a great radio. I didn’t think there’d be much improved over the TM-D700 (which I also own), but I like the new software and interface, it’s a little more logical to use.

The Green Light Labs GPS-710 is a very compact and sensitive (20 channel SiRF-III chipset) GPS unit. It simply attached attaches to the rear of the D710 control panel with strong adhesive strips. A small jumper cable connects it to the panel for power, and another small lead delivers the NMEA output. After it was connected, there are just a couple of settings to change in the radio and It Just Works.

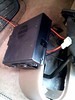
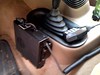
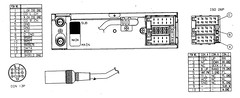
Installing the radio was also quite easy. There were already some hold holes in the transmission tunnel console, where I suppose a radio was previously mounted. I reused most of the holes, and found some good stainless steel hardware to use with the supplied bracket.

Kenwood TM-D710 main unit

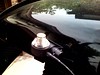
Next, running the power and antenna cables was quite easy. There’s a bulkhead hole, complete with rubber weatherproofing above the clutch pedal. I simply ran the cables (and props to Diamond antenna who provide small plugs on their cables just for this purpose) through the bulkhead hole and cable-tied them above the pedals and ran them into position. The cables simply pushed up into the console, but I cable-tied them inside to keep them secure.

Diamond K400S Antenna mount

Next I mounted the control panel on the dash, using the supplied bracket and adhesive stand. It seems to be sticking well enough as I write this.

Finally, I had to run the control cable from the radio, being behind the glove box and up onto the dash. The Dodge Ram has a reasonable easy way to do this on the passenger side, it’s a bit busy on the drivers side, but Kenwood provide a long cable so the passenger side worked well. This cable is completely hidden except from the glass to the radio, which is about all you could hope for unless you drill the dash.

Kenwood TM-D710 main unit

Finally, I tidied things up and gave it a test. Worked first time!

KD0AIC-12 is on the air!

DV-Dongle for D-Star

A few days ago I bought a DV-Dongle, a device which plugs into your USB port (Mac or PC) and allows you to connect over the internet to the D-Star network via D-Star gateways. Once connected, you can have a D-Star digital voice conversation without a radio. I thought it would be particularly useful when I’m on the road and outside the coverage area of a D-Star repeater.

I bought the DV-Dongle from Ham Radio Outlet here in Denver, and it’s not just plug and play.

Firstly, for Mac users, you have to download some virtual com port drivers from this site, and then restart.

Next, download the tarball here, which installs the software (mostly Java).

Now it installs into a folder called “DVTool”, and when I tried to start DVTool.jar, it looked like it worked, but it didn’t. There was some error complaining about “can’t find ascpserialdimac”. So I tried starting from the command line, using dvtool.sh and everything worked.

Just in time for me to get into the Thursday evening W6DHS D-Star net.

HF Mobile Antenna Installation

In the corner of the garage I’ve had a High Sierra HS-1800/Pro for about a year. I’d procrastinated as I knew the install would be a little “mechanical”, involving drilling the bodywork of the Green D90.

High Sierra HS-1800/Pro Antenna

But, having recently attained my General Class license, I though I should just get it done.

Having purchased the ”Platinum Package”, I had everything I needed to install the antenna.

Firstly, I lined up the mount at the rear of the D90 (making sure I had garage clearance), and had the top 2 bolt locations line-up in the rear interior and the bottom 2 line-up inside the wheel-arch outside the truck. I braced the nuts and bolts with a couple of sheets of aluminum on the non-visible sides. Next, I drilled holes for the ground, power and co-ax. The ground is a short run below the antenna to the exhaust bracket. The power runs in the top of the bracket to the interior. The co-ax runs a little higher and into the interior with a female-female SO-239 connector.

High Sierra HS-1800/Pro Antenna

With the bracket mounted and the basic cabling laid, I added powerpole connectors to all the electrical connectors.

Plugging in the tuning module (basically a fancy switch that moves the antenna up and down, and altering it’s electrical length while showing the SWR), I could see the antenna was working - I could also hear it working!

I knew I wouldn’t like the HS way of tuning the antenna, so at the same time I bought a ”Turbo Tuner”. This would enable me simply to hit the tune button on my IC-7000, wait a few moments, and have the Turbo Tuner find the lowest SWR for the frequency I require. As the Turbo Tuner has great reviews, I thought it’d be a great way of doing this.

Alas, I ran into problems almost immediately. Despite triple-checking the connections (one to the CI-V port, the other into the tuner port), and the settings (basically the baud rate and the CI-V address) I could not get it to work. After more experimenting I decided to do a factory reset on the IC-7000 to see if that would help. But that meant loosing all the information I had stored in memory… I had a cup of tea and a think…

As luck would have it, the mail showed up, complete with CI-V leads and my IC-7000 cloning software - perfect timing! A couple of days ago I ordered the WCS7000 software from RT Systems. As soon as I installed the software, I had the rig backed up and performed the reset.

Voila! It worked! The tuner was tuning. But not quite right. The instructions suggest that for the HS1800/Pro antenna the direction should be “normal” and the stall current should be “750ma”. After some experimenting, I had to change the dip-switch settings so the direction was “reverse” and the stall current was “500ma” (so the antenna would reverse direction when it reached the end of its travel).

That seemed to fix things, but then my radio started playing up. I’d read some background on how final stages can be destroyed by ill-using antenna controllers. But I’d done my research and the Turbo Tuner shouldn’t do this! My IC-7000 display was wavering and when I hit PTT most times it would restart.

Then I realised that I’d be transmitting all morning, and the antenna was moving up and down and the rig needs a good 13.8V to work correctly. So I started the D90 and all was well again, phew!

I dressed in the cables, and am ready to give it a good test tomorrow!

Useful APRS Links

Background Info: Wikipedia Overview Bob Bruninga’s Site APRS Wiki

Position Updates: The Google Maps based, and nicest looking - aprs.fi Easy to use, and my preferred mobile site - db0anf.de The dated, but still useful findu.com A different approach on the interface - k6ib.com

APRS (Automatic Packet Reporting System) in the D90

I’ve finally installed Mobile APRS in the Green D90. I’ve had static APRS working, but it was time to integrate GPS into the system; particularly useful when we head out to remote locations as we do most weekends.

The original plan was to simply send the trucks current coordinates as acquired by the GPS via a TNC to the radio and out, to be picked up by other stations and relayed to an igate and from there onto the internet where many various sites show your position in near real-time.

This would have been a very simple setup consisting of a Garmin GPS16HVS, an OEM unit that basically integrates the GPS and antenna into a single unit without a display, a Kantronics MT-1200 TNC and an Icom IC-2200 single band radio.

However, I ran out of time (I wanted it working for our Utah “Hole in the Rock” trip), and didn’t want to go back to Radio Shack for another 2.5mm 3 way jack so I dug out my “spare” Kenwood TM-D700A, which has a built it TNC and would save some time during the configuration.

With the Kenwood radio, the system simply consisted of the GPS16 connected to the D700A radio.

Installing the GPS16 was a small problem. It comes with a magnetic mount, which, of course, is no use in an aluminum-bodied Land Rover Defender (actually, it’s Birmabright). The green D90 is a bit old and beat up anyway, so I wasn’t too bothered about drilling the roof. I drilled 4 holes for the GPS16 and another 4 for the cable passthrough (a waterproof marine-grade ”Cable Clam”, made by Blue Sea Systems and available from from West Marine), and simply fed the cable through.

The GPS16 ships with an RJ45 connector, and I can’t imagine what use it has except for factory testing. After cutting it off, there are basically 2 sets of data wiring and also power wires in a very compact space (as described in the manual - PDF link). It’s a simple job, but fiddly connecting the power to my usual 45A Anderson Powerpole connectors and a 3-way 2.5mm jack. Initially I forgot that the data ground has to be cross connected to the ground, so the GPS did not switch on.

I removed the 2.5mm jack and connected an DB9 socket so I could connect a terminal to the GPS16. It was about now I realized that it wasn’t powered on (there is no indicator light to show this), but I was amising myself watching the NMEA sentences appear on my terminal. I also downloaded the Garmin SNSRCFG software, which enabled me to play with a ton of settings in the GPS16. I just made sure the data it was acquiring was correct before disconnecting it and putting the 2.5mm jack back on.

Then, I connected the jack to the radio and to my delight I saw the GPS indicator flashing, meaning that the radio was receiving telemetry from the GPS. Fiddling with a few settings on the radio, to configure it to take position data from the GPS and override the manual co-ordinates I’d entered earlier, I saw the “MY POS” indicator flash up, showing that APRS data was being transmitted. A drive around the block and a quick visit to db0anf, and I could see my position being updated in near real time. Success!

You can see my position updates here.

Overall, the Garmin GPS16 and Kenwood TM-D700A radio is a great combination for hands off APRS work.

I do have a few more steps to finish this little project, including making a small breakout box for the GPS16, which will have switched power and a connection for both the radio (via a jack) and terminal (via a DB9). And then I’ll have to do it all again for the black D90!

Home Dual-band Antenna Installation

I’ve finally got around to installing by base station 2m/70cm antenna no more using the crappy mag-mount!

Completed install

The Diamond X-50A antenna was my antenna of choice after sizing up the chimney stack and reading some good reviews.

I also needed a way of mounting to the chimney - I sourced a 5ft mast from Home Depot and a Channel Master 9067 chimney mount.

5ft Mast and Bracket detailChannel Master 9067

Finally, from Ham Radio Outlet (one of the few brick and mortar stores I still visit), I bought 65ft of LMR-400 (PDF specs) and 30ft of LMR-400 Ultraflex (PDF specs). These cables are made by Times Microwave and so far seem to be exceptional quality.

Diamond X-50 and mast detail

I bought this coax as the loss figures for VHF and UHF were the lowest I could find.

The install wasn’t too difficult. I installed the Chimney Mount to the chimney (be careful of the stainless steel straps, they’re sharp and I have the scars to prove it), pulling the straps with pliers before crimping them to the brackets. The brackets then adjust with a pair of bolts, making the last bit of tightening possible with just a wrench.

Once the mount was installed, I simply installed the mast, which tightens with 4 bolts to the clamp, and popped the antenna on top. I also drilled a hole in the mast to mount a screw through the clamps to stop the mast rotating. Now it got windy, and I called it a day for now…

The next day was about cabling, so with my 65ft of LMR-400, I attached a PL-239 and climbed up to the roof again to install.

Of course, the PL-239 would not fit through the mast - damn! The mast, after all, was designed for TV antennas and a smaller connector would fit through easily. Still, I needed a short patch lead, so I chopped 1m of cable off, threaded it through and attached a new plug. After securing everything, and double-checking all the nuts and bolts, I walked the cable across the roof (I’ve not yet found a good way of securing cabling on the roof), and down the side of the house closest to the basement window where my office/shack is located.

I quickly popped the cable through the window, attached another PL-239 and connected it to my IC-7000 via an SWR meter and threw out a test transmission.

I’m happily seeing S9/S9+ from the local repeaters on VHF and UHF, with an SWR of as close to 1 as I reckon is possible. Now I’m looking forward to participating in some of the Denver area Nets more frequently.

Next step, lightning protection! We get a lot of lightning here in Denver, and currently the manual disconnect will have to do, but getting some expensive copper from the roof and into the ground is a high priority.

Club Cards on Your iPhone

This is a great suggestion from lifehacker.

I have loads of hotel, airline and other membership cards. In fact, I don’t have a wallet big enough for them all so they sit in a drawer at home. I used to have a list of the numbers somewhere, but it quickly became out of date.

Club card example

One thing I do have with me 95% of the time is my iPhone. And now, as I’ve scanned all my cards and put them in a gallery in Aperture and sync’ed with my iPhone, I have all my cards with me when I need them!

The only two issues I see are, 1, don’t just credit cards, drivers licence, etc. as your phone may be lost/stolen, and 2, it’s difficult to swipe the mag stripe! :)

Here’s the original article.

Testing Ecto - an Off-line Blog Editor

While on Persia Overland, I was using the off-line blog editing software MarsEdit 2 (which made me think often of Marsport).

It’s certainly good enough to use on the road, when time is a premium, but the way it manages media is a bit of a pain. I really want Aperture integration, which lead me to try ecto. I also need to host my own image files, as I found that flickr is blocked in Iran and other countries (although there is a workaround for Firefox users, which I’ve used and recommend), and Ovi blocks access geographically from certain IP address ranges.

So far, so good. It lets me upload images directly to my site, easily embed thumbnails thus;

Bewcastle, er, castle

and has the other features you would expect (html editor, easy linking, good tag and category support, etc.)

I’ll try it for a few more days and see how it goes.

ICE Upgade for the NAS D90

My 1997 NAS D90 still had it’s original ICE system in place. It was basically a Clarion head-unit with a 6-disk CD changer. It also has a factory-fitted amplifier driving 4 speakers. Now, I don’t use CDs (except to rip them once), and the changer takes up room in the center console. Plus I was using a pretty awful cassette-tape connector to listen to my iPod/iPhone when driving. After much research I ordered an Alpine iDA-X100 - the revised version of their first “iPod only” head-unit, the iDA-X001.

6643C826-BFDC-442F-B748-B2DB84391A22.jpg

I decided to keep the factory amp and speakers, the amps is fine and I’ll replace the speakers this summer. That meant connecting the new head-unit to the existing wiring. Now, I’m not going to hack a factory wiring-harness unless I have to so I managed to get a harness that was close enough to work.

As the 1997 D90 was the only year with this configuration, I had to figure out what each on the pins on the factory harness was for. There was some documentation on the web (1, 2, and a useful 3), but I also had to add connectors to the custom harness so it would work with the factory harness. The Alpine unit came with its own unterminated harness, and good documentation (PDF link), it was easy to connect to my wiring.

The pinouts look like this: (click though for large version)

Defender Clarion pinouts

The pinouts for the 10-way connector are for the speakers and self-explainatory. The pinouts for the 8-way connector are as follows:

(Pin 1 is the top left, above the keyed part of the connector, pin 2 is below pin 1, pin 3 is to the right of pin 1, etc.)

  1. Phone Mute - not used
  2. Amp Trigger
  3. Remote - not used
  4. 12V+
  5. Remote antenna - not used (power for an electric antenna)
  6. Illumination
  7. ACC - 12V+ switched
  8. Ground

Once I had my wiring adaptor cabled, it connected to the factory harness and the x100 works like a dream! Highly recommended.

From Crutchfield, I ordered the following components: Alpine iDA-X100 Head-unit Alpine KCE-422i high-speed cable for iPod/iPhone Receiver Wiring Adaptor for Land Rover Antenna Adapter

Beffa Gastrobetrie

I was traveling through Zurich, and was looking for a good local place to eat. You can do worse than the Beffa Gastrobetrie. Good food, good beer and no English! It’s a small chain (I assume it’s family owned), and I ate at the Restaurant Weisses Kreuz, Falkenstrasse 27, 8008 Zurich. It has the added bonus of being able to jump onto the MacDonalds free WiFi!